This is an old revision of the document!
Table of Contents
Netzer IO

Overview
Here is a short overview of the 13 available pins of Netzer.
| Netzer Name | ID | PIC Pin | Maximum output current | Maximum input voltage | Description and additional functionality |
|---|---|---|---|---|---|
| SPI_INT | j | RC2 | 25 mA | 5,5 V | PWM and impulse output |
| SPI_CLK | k | RC3 | 25 mA | 5,5 V | Clock line of the SPI module - RTS output for Asynchron serial interface (UART) (Since Version 1.5) |
| SPI_MI | l | RC4 | 25 mA | 5,5 V | Data input of the SPI module - CTS input for Asynchron serial interface (UART) (Since Version 1.5) |
| SPI_MO | m | RC5 | 25 mA | 5,5 V | Data output of the SPI module |
| SPI_CS | i | RF7 | 2 mA | 5,5 V | GPIO |
| RX | h | RC7 | 25 mA | 5,5 V | UART Receive line |
| TX | g | RC6 | 25 mA | 5,5 V | UART Send line |
| IO0 | a | RB0 | 25 mA | 5,5 V | Interrupt input, Edge counter, impulse trigger |
| IO1 | b | RB1 | 25 mA | 5,5 V | Interrupt input, Edge counter |
| IO2 | c | RB2 | 25 mA | 5,5 V | Interrupt input, Edge counter |
| IO3 | d | RD1 | 8 mA | 5,5 V | PWM and impulse output |
| IO4 | e | RA2 | 2 mA | 3,3 V | ADC input |
| IO5 | f | RA3 | 2 mA | 3,3 V | ADC input |
All Netzer pins are freely configurable via the Netzer webinterface as digital input or output. Appropriate pins can be configured as PWM or impulse output or analog inputs. The ID is used as shortcut on the GPIO websites and in the protocols of GPIO server, command interface and serial server.
Every IO-pin has an own configuration page, accessible via the GPIO main page. The signal direction is configured here, but also alternate functions such as PWM, pulse, edge counter and ADC can be set.
Websites
General configuration

The automatic reload sets after how many seconds the GPIO main page shall be reloaded automatically (in the event of monitoring certain inputs). Reload is activated by the browser, hence the browser is required to support the refresh (look at the browser documentation for this).
GPIO page

The GPIO main page enables a quick overview and access to all IOs. Digital signals are represented in the form of a checkbox or a ball (depending on whether Javascript is configured. Inputs are exclusively readable. PWM-/pulse values are demonstrated as a text field, hence can be directly changed.
From the main page, you can change to one of the IO configuration pages by selection of the corresponding ID in the “configure” box.
Digital outputs
Every Netzer pin can be configured as a digital output. A logical '0' corresponds to the voltage level 0 V, a logical '1' to the voltage level 3,3 V. You can see the maximum current carrying capacity in the table in the Overview.
For further electrical data please refer to the datasheet of the Netzer controller.
On the IO configuration page, you can determine the start value that is accepted after restarting Netzer.
You can write and read the output via the GPIO main page or via the GPIO server or command interface.
Digital inputs
Every Netzer pin can be configured as a digital input. Doing so, you will have to observe the maximum permissible input voltage (see IO table in the Overview). You can see further electrical data in the datasheet of the Netzer controller.
For every digital input you may configure whether in the event of occurring changes at the pin (rising, falling or both edges) a message shall be directly sent to the GPIO server or command interface.
Edge counter

IO0, IO1 and IO2 are provided with edge counters. Depending on the setting, rising or falling edges are counted. The direction of counting (decrementing or incrementing) can be configured. It is a 15 bit counter. Overflows are registered and displayed on the respective IO page. Via the reset checkbox the reading can be reset. The reading and the overflow flag can be accessed also from GPIO server or command interface.
The filter enables debouncing of for instance button or relais contacts and may be set in steps between 1 ms and 250 ms.
If it is dealt with an external signal source that is to be counted, the pin is configured as a digital input. However, it is also possible to count output edges, for example how often the GPIO server has already written a signal.
Pulse trigger (IO0)
The IO0 channel has installed some more interrupt handling than IO1 and IO2. Apart from the normal digital function and the edge counter functionality IO0 can handle the following features:
- Reload the impulse timer which is used for capture and impulse generation on IO3 and SPI_INT
- Initiate pulse on IO3 and SPI_INT.
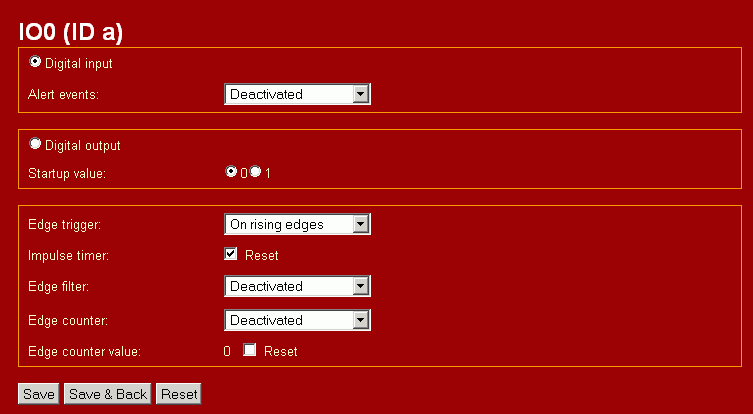
The impulse timer is the core part for generating and measuring impulses on IO3 and SPI_INT. If the reset check is marked the dedicated impulse timer is reset when the IO0 interrupt occurs.
For the activation of the interrupt handler, the I00 edge trigger must be activated.
Depending on the setting, the pulse is activated in the event of negative or positive edges. The edge counter, however, must not be necessarily active for pulse activation. For external trigger signals, IO0 must be configured as a digital input.
PWM- and pulse generator
IO3 and SPI_INT may be used for the generation of PWM or pulse signals. The following figure shows an example of the configuration dialog for IO3.

- PWM frequency
- Impulse mode
- Impulse unit
- Calibration offset
PWM
Continuous PWM signals are set via a 10-bit value (0..1023). This value represents the pulse control factor of the signal. The value itself is written and read via the GPIO main page or via the GPIO server.
The PWM start value is the default setting directly after restart of Netzer.
The PWM value influences the length of the first half cycle in relation to the second one. Depending on the polarity (logic) of the signal, a direct voltage of 0 V (logic=0) or 3,3 V (logic=1) is created for example in the event of a PWM value=1023.
The PWM frequency finally directly incluences the length of the two half cycles. The values 40 kHz, 10 kHz and 2.5 kHz are supported.
The PWM mode uses an independent timer (NOT the impulse timer). It is shared between IO3 and SPI_INT if both are configured for PWM only. Those the PWM frequency is set for both IO3 and SPI_INT if configured as PWM.
Impulse output
In impulse mode, individual or also continuous pulse sequencies may be generated.
The pulse value is 16 bit in width, but has a minimum value of 100, which cannot be fallen below. The value itself is written or read via the GPIO main page or via the GPIO server or command interface. The pulse length is internally buffered so that the output signal does not accept any inadmissible states in the event of amendments.
The logic refers to the polarity of the pulse. 0-Logic means the pulse is 0, the pin accepts the 1-state. 1-logic means the pulse is 1, the pin accepts 0-state.
The start value is the default setting directly after restart of Netzer.
If the pulse is triggered, a pulse of the length (current pulse value * pulse unit) is generated at the pin. You can set the units 100 ns, 200 ns, 400 ns and 800 ns.
Mode single current pulse
The pulse is always triggered whenever a new pulse value is written.
Mode trigger of IO0
The pulse is always triggered whenever configurable edge occurs at IO0.
Mode continuous
Analogous to PWM a pulsed current is generated at the pin. It is always triggered whenever an internal counter flows over. The time duration of the counter is (65556*pulse unit). For IO3 and SPI_INT the same internal counter is used, so that both signals are always in phase.
Read more on the impulse page.
Input capture (since version 1.6)
It is possible to measure pulses or even periodic signals with input capture mode. The capture (second) edge can be configured as falling or rising one. The trigger edge depends on the common impulse mode parameter (see below).
On Netzer startup or after configuring for capture mode the measured value is set to 0. The measured value can also be written to any value at runtime. For instance the value can be set to 0 after reading out to distinguish old from new values.
The measured value must be multiplied with the set time unit to get the final measured time.
The measured value is 0xFFFF if the timer has overflown before the capture edge has occured.
Mode single current pulse
For this mode one of the both impulse channels (either IO3 or SPI_INT) must be in Impulse output mode. Whenever a new pulse value is written to the impulse channel the trigger edge for capture is fired.
For instance a signal can be measured relativly to the self fired pulse.
Mode continuous
For this mode one of the both impulse channels (either IO3 or SPI_INT) must be in Impulse output mode. Each time the internal timer overflows (65556*pulse unit) the trigger edge for capture is fired.
For instance a signal can be measured relativly to the self fired pulses.
Mode trigger of IO0
The IO0 triggered edge is the trigger edge for the capture.
For measuring a signal IO0 and IO3 resp. IO0 and SPI_INT must be connected together.
If trigger edge and capture edge are the same the period of a signal can be measured. If trigger edge is falling and capture edge is rising the low impulse width of a signal can be measured. If trigger edge is rising and capture edge is falling the highimpulse width of a signal can be measured.
Read more on the impulse page.
ADC
IO4 and IO5 measure voltages between 0 and 3.3 V. The following figure shows an example of the configuration dialog for IO4.

The measuring value is 10 bit (0..1023) in width. It can be queried via the GPIO main page or the GPIO server or command interface. The ADC automatically calibrated after Netzer restart. Both channels share the same ADC. The ADC is only activated whenever a readout procedure is activated. The readout procedure takes approx. 2.5 µs.


